
How to Set Up PS2 BIOS on AetherSX2 (Step-by-Step Guide)
Your PS2 games will not run on AetherSX2 without a PS2 BIOS file, and that is the part many users overlook.
Many users get confused about BIOS versions, regions like NTSC-U or PAL, and why the emulator asks for this file in the first place. Once you understand what the BIOS does and how it fits into the setup, everything makes sense.
This guide explains how the PS2 BIOS works with AetherSX2, what you need, common errors users face, and how to make sure your games run smoothly on Android
What Is PS2 BIOS and Why AetherSX2 Needs It
A PS2 BIOS file is the system software that allows the AetherSX2 emulator to boot and run PlayStation 2 games properly. Without it, the emulator cannot start a game, just like a real PS2 cannot start without its internal firmware.
What a PS2 BIOS File Actually Does
The PS2 BIOS works as the console’s startup system. It checks the virtual hardware, loads the system menu, and prepares the game to run. In AetherSX2, the BIOS performs the same role it does on a real PlayStation 2.
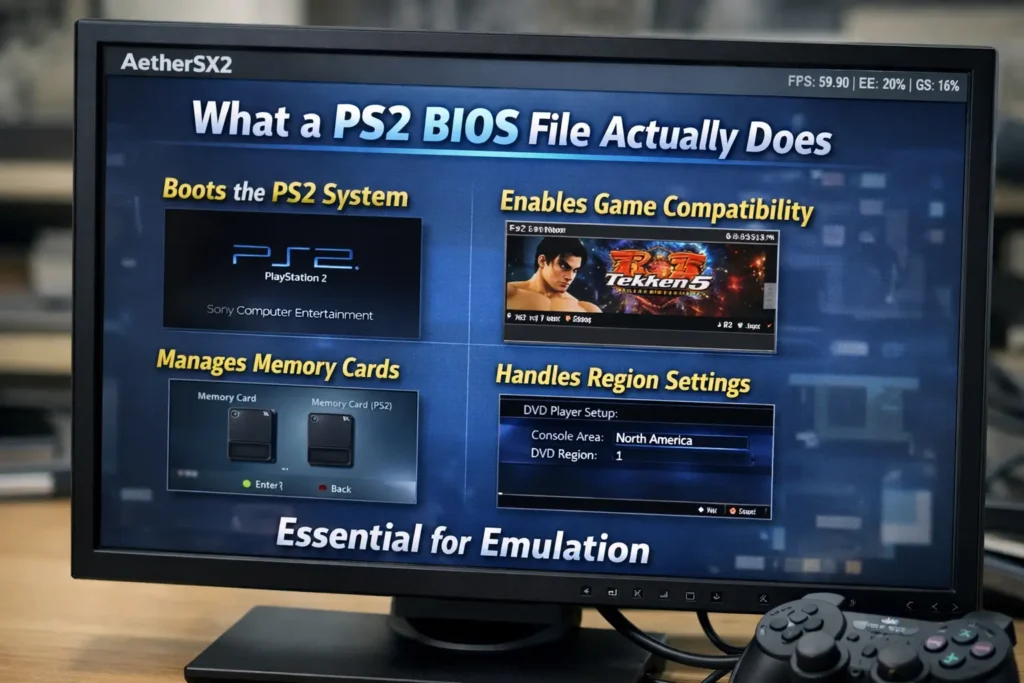
The BIOS also controls region types such as NTSC-U (USA), PAL (Europe), and NTSC-J (Japan). Choosing the correct region improves compatibility and reduces boot errors. Common stable versions include SCPH-39001, SCPH-70012, and SCPH-90001.
In simple terms, the BIOS allows AetherSX2 to act like a real PS2 console.
What You Need Before Setting Up PS2 BIOS
You need three things before setting up a PS2 BIOS on AetherSX2: the emulator installed on your Android device, a valid PS2
Required Files and Tools
Before you begin, make sure you have:
Place the BIOS file in a simple folder such as Internal Storage > PS2 > BIOS. Clean folder structure prevents detection issues during setup.
If one of these pieces is missing, the emulator will not load games.
Recommended BIOS Versions for Best Compatibility
Choosing the correct PS2 BIOS version improves game stability and reduces boot errors in AetherSX2.
Here are stable and widely tested versions:
| For USA Games (NTSC-U) | For European Games (PAL): | For Japanese Games (NTSC-J): |
|---|---|---|
| SCPH-39001 | SCPH-50003 | SCPH-10000 |
| SCPH-70012 | SCPH-70004 | SCPH-70000 |
| SCPH-90001 |
These versions work well with most US PS2 ISO titles and provide consistent performance across genres like racing, action, and sports games.
If you are unsure, check your game ISO region first. Using the correct BIOS region is like using the right plug for a socket. If it does not match, it will not work properly.
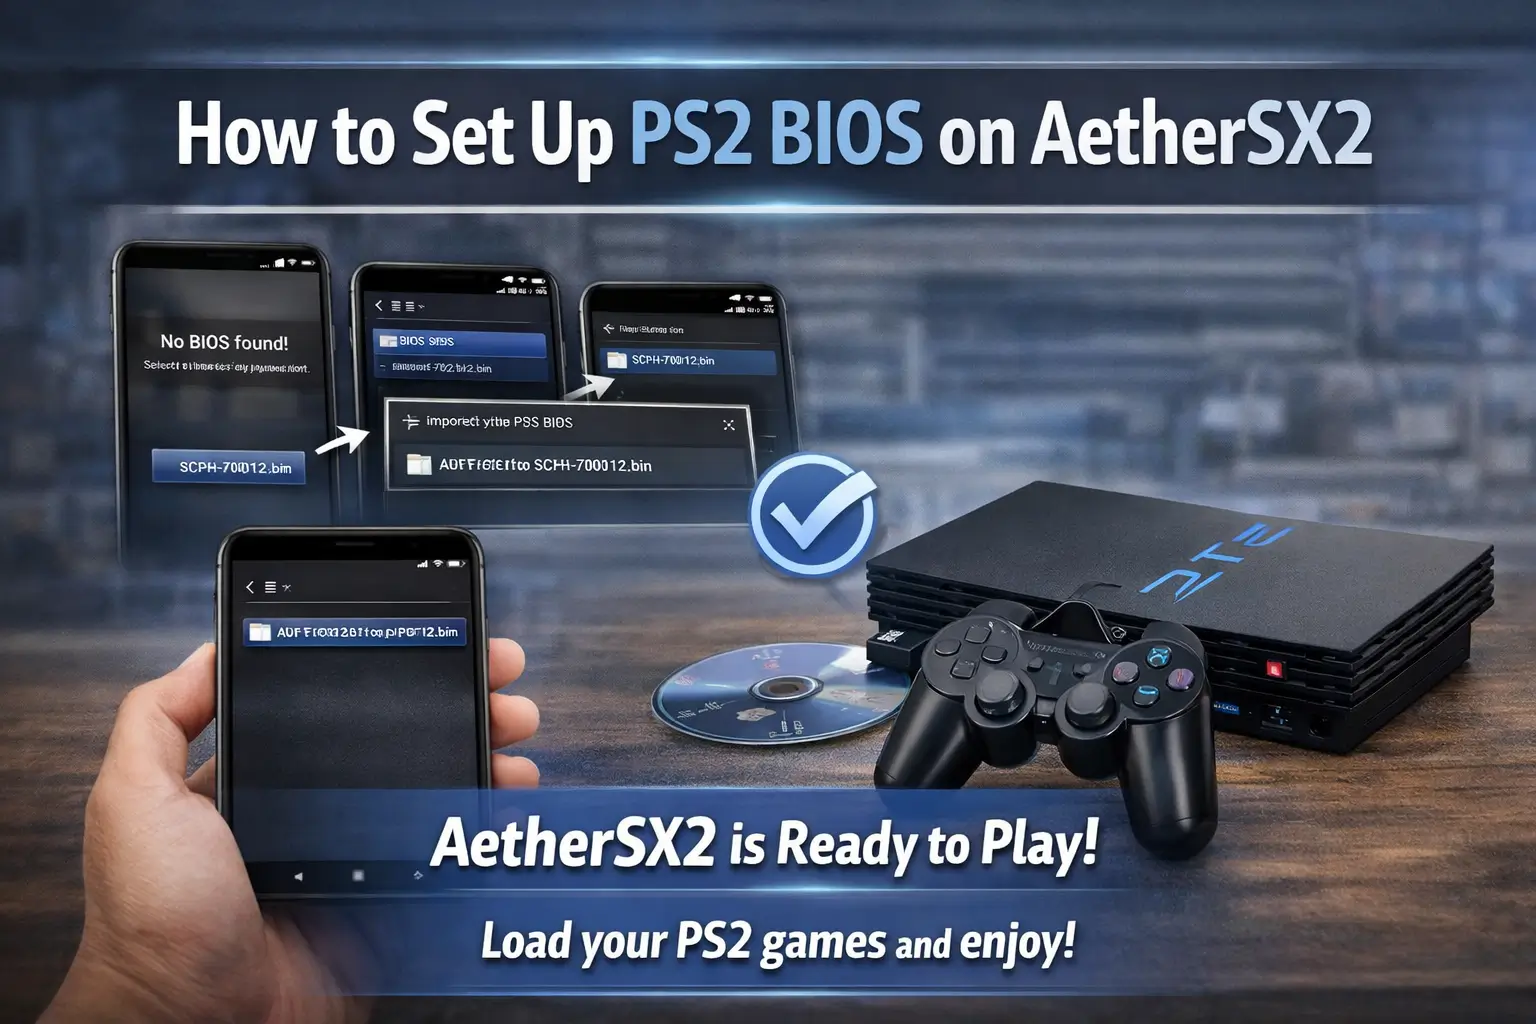
How to Set Up PS2 BIOS on AetherSX2
To set up a PS2 BIOS on AetherSX2, you need to import the BIOS file into the emulator and select it as the default system firmware.
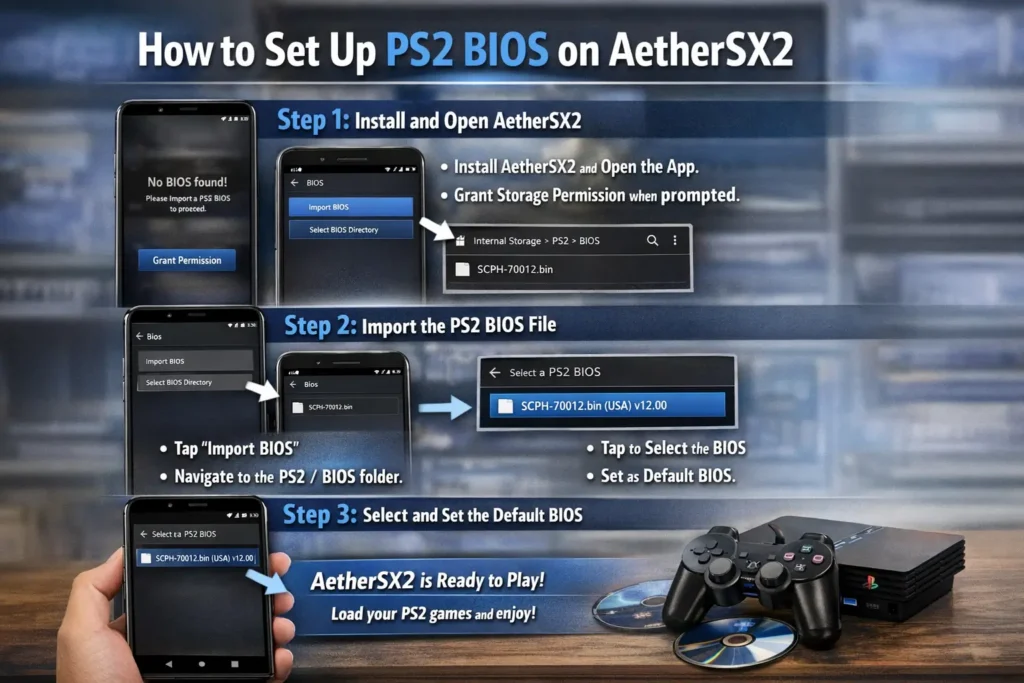
Step 1: Install and Open AetherSX2
Install the AetherSX2 emulator on your Android device and open it for the first time. When you launch it, the app will ask for storage permission. Grant access so the emulator can scan your internal storage for BIOS files and PS2 ISO games.
After permission is granted, you will see the main dashboard. If no BIOS is installed yet, the emulator will display a message asking you to import one. This is normal. The emulator cannot run without a valid BIOS.
Make sure your BIOS file is already saved in a clear folder such as Internal Storage > PS2 > BIOS before moving to the next step.
Step 2: Import the PS2 BIOS File
Tap on the BIOS setup option inside AetherSX2. Select “Import BIOS” or “Select BIOS Directory” depending on your app version.
Navigate to the folder where you saved the PS2 BIOS .bin file. Select the folder, not the compressed file. If the BIOS is still inside a .zip or .rar file, extract it first.
Once selected, the emulator will scan the folder. If the file is valid, it will appear in the BIOS list with its version number, such as SCPH-39001 or SCPH-70012.
If no BIOS appears, check the file format and confirm it ends with .bin.
Step 3: Select and Set the Default BIOS
After the BIOS appears in the list, tap on it to set it as the default system BIOS. Make sure the region matches your game ISO, such as NTSC-U for US games or PAL for European games.
Save the settings and return to the main menu. Your BIOS setup is now complete.
At this point, AetherSX2 is ready to load PS2 ISO files. If the BIOS was imported correctly, games should boot without a “No BIOS Found” error.
How to Check If the BIOS Is Working Properly
To check if your PS2 BIOS on AetherSX2 is working, you need to boot the system menu or launch a PS2 ISO game and confirm it starts without errors.
Booting Into the PS2 System Menu
Open the AetherSX2 emulator and go to the main screen. Instead of loading a game, choose the option to boot into the BIOS system. This loads the original PlayStation 2 menu just like a real console.
If the BIOS is installed correctly, you will see the classic PS2 startup screen followed by the system configuration menu. You can access memory card settings and system options from here. If this screen appears, your BIOS file is working properly.
Booting into the system menu is the fastest way to confirm that your PS2 BIOS file is active and recognized.
Testing with a PS2 ISO Game
After confirming the BIOS loads, return to the main dashboard and select a PS2 ISO file. Choose a game that matches your BIOS region, such as NTSC-U for USA games.
If the BIOS is set correctly, the game should pass the startup screen and move into the game menu. You should not see errors related to missing firmware.
If the game freezes at launch or shows a black screen, check three things:
- The BIOS region matches the game region
- The ISO file is not corrupted
- The BIOS is selected as default in settings
When both the system menu and a game boot successfully, your AetherSX2 BIOS setup is complete and functioning correctly.
Common PS2 BIOS Setup Errors and How to Fix Them
If your PS2 BIOS on AetherSX2 is not working, the issue usually comes from the file format, folder location, or region mismatch. Most problems can be fixed in a few minutes.
BIOS Not Detected in AetherSX2
If the emulator does not detect your PS2 BIOS file, check the file format first. The file must end in .bin. AetherSX2 will not read .zip or .rar files, so extract them before importing.
Next, confirm the BIOS is placed inside a simple folder such as Internal Storage > PS2 > BIOS. If the file is buried inside multiple folders, the emulator may fail to scan it.
If the BIOS still does not appear, the file may be corrupted. Replace it with a clean dump from your own PlayStation 2 console.
Black Screen When Booting a Game
A black screen usually means the BIOS region does not match the game region. For example, using a PAL BIOS with an NTSC-U game can cause startup failure.
Open BIOS settings and confirm the correct version is selected. If your game is from the USA, choose SCPH-39001, SCPH-70012, or SCPH-90001.
Another cause can be a damaged PS2 ISO file. Test another game to confirm the issue is not ISO-related.
You should also check graphics settings. If you changed renderer options or increased resolution scaling too high, reset to default settings and test again.
“No BIOS Found” Error
If you see a “No BIOS Found” message, the BIOS may not be set as default. Go to BIOS settings and select the correct version manually.
You can also rescan the BIOS directory from inside the emulator. This forces AetherSX2 to search the folder again.
If rescanning does not fix it, delete the BIOS entry and re-import the .bin file. Make sure the file is not renamed incorrectly.
Once the emulator recognizes the BIOS and sets it as default, this error should disappear.
Best Settings After Installing PS2 BIOS
After installing the PS2 BIOS on AetherSX2, adjust a few settings to improve performance and reduce lag. These changes help games run smoother, especially on mid-range Android devices.
Controller Setup
Memory Card Configuration
Setting up controls and memory cards correctly prevents progress loss and improves overall gameplay stability on AetherSX2.
Conclusion
Setting up a PS2 BIOS on AetherSX2 is simple when you follow the right steps. You install the emulator, place the correct PS2 BIOS .bin file in a clean folder, import it, and select the right region. Once the BIOS loads and a PS2 ISO game boots without errors, your setup is complete.
Most problems come from small mistakes such as using the wrong region, keeping the file compressed, or not setting the BIOS as default. Fix those, and the emulator works as expected.
Now load your favorite PS2 game and test it. If it boots smoothly, you did everything right.