
PS2 BIOS Download for PCSX2 & AetherSX2 (All SCPH Versions, Verified Files)
Download verified PS2 BIOS files for PCSX2 and AetherSX2, including USA (NTSC-U), PAL, and NTSC-J versions for all major SCPH models. Every file is CRC-checked, correctly labeled, and ready for quick setup on PC or Android.
| File Name | PS2Bios |
| File Size | 12MB |
| Supporting OS | Windows, iOS and Android |
| Downloads | 500k+ |
| Supporting Emulator | PCSX2, PS2emu, AetherSX2 |
| Last Update | 5 Hours ago |
PS2 BIOS is the firmware file every PS2 emulator needs before it can run a single game. It’s also the one file standing between you and the full PS2 library – God of War, GTA San Andreas, Shadow of the Colossus, all of it – running on your PC or Android device.
Without it, PCSX2 and AetherSX2 won’t boot. Period.
We host verified, region-specific PS2 BIOS files for every major SCPH model. Every file is CRC-checked, correctly labelled, and ready to load straight into your emulator. No dead links, no corrupted files, no guesswork.
Below you’ll find every BIOS version broken down by region and model, plus a complete setup guide for both PC and Android.
What Is PS2 BIOS?
The PS2 BIOS is the PlayStation 2’s built-in firmware that allows the console to boot and operate correctly. It initializes the hardware, performs basic system checks, and manages communication between components like the CPU, memory, and disc drive before any game can start.
Since the BIOS controls the startup process and core system functions, the PS2 cannot run without it and emulators such as PCSX2 and AetherSX2 also require it to function properly.
BIOS stands for Basic Input/Output System.
What are the Features of PS2 BIOS?
The PlayStation 2 BIOS includes several built in system functions that control how the console operates. It manages:
Boot System
The BIOS loads the PlayStation 2 startup screen and system configuration menu. It prepares the console or emulator environment before launching a game.
Region Lock Control
Each BIOS version is tied to a region such as NTSC U, PAL, or NTSC J. The BIOS verifies regional compatibility between the system and the game.
Hardware Compatibility Management
The BIOS coordinates communication between the Emotion Engine CPU, graphics processor, and storage devices. This ensures games run as originally designed.
Memory Card Management
The BIOS controls save file creation, deletion, formatting, and data access. In emulators, this function supports virtual memory cards.
So when people say “you need a BIOS file to run PCSX2 or AetherSX2,” this is exactly why. You’re not downloading a cheat code or a shortcut. You’re getting the one piece of the PS2 that no emulator can build from scratch.
USA PS2 BIOS Files for PCSX2
If you’re looking for USA PS2 BIOS files, choose an NTSC-U BIOS version such as SCPH-39001 or SCPH-70012. These BIOS releases are designed for North American game discs and generally provide the best compatibility with USA-region PS2 ISOs.
Why You Need a PS2 BIOS to Play PS2 Games on Emulators

You need a PS2 BIOS because emulators like PCSX2 and AetherSX2 cannot run PlayStation 2 games without the original system firmware. The BIOS creates the real PS2 environment inside the emulator. Without it, the emulator has nothing to boot.
If a BIOS file is missing or invalid, these problems usually occur:
- Emulator will not boot
- Black screen errors
- Compatibility failures
BIOS vs ISO vs ROM
Many users confuse these files, but they serve completely different roles.
PS2 BIOS
Game ISO
ROM File
PS2 games are not technically ROMs because the console used discs, not cartridges. That is why ISO is the correct format for PlayStation 2 games. When all three parts work together correctly, games run smoothly. If the BIOS is missing, the ISO alone cannot start.
Types of PS2 BIOS Versions (SCPH Models & Regions)
Different Pcsx2 BIOS versions are based on console model numbers and regional releases. Sony released the PS2 in multiple hardware versions across different regions over its 13-year lifespan. Each version came with its own BIOS chip. Picking the wrong one can mean compatibility problems, region errors, or games that simply won’t run.
The main differences come from hardware revisions and regional video standards.
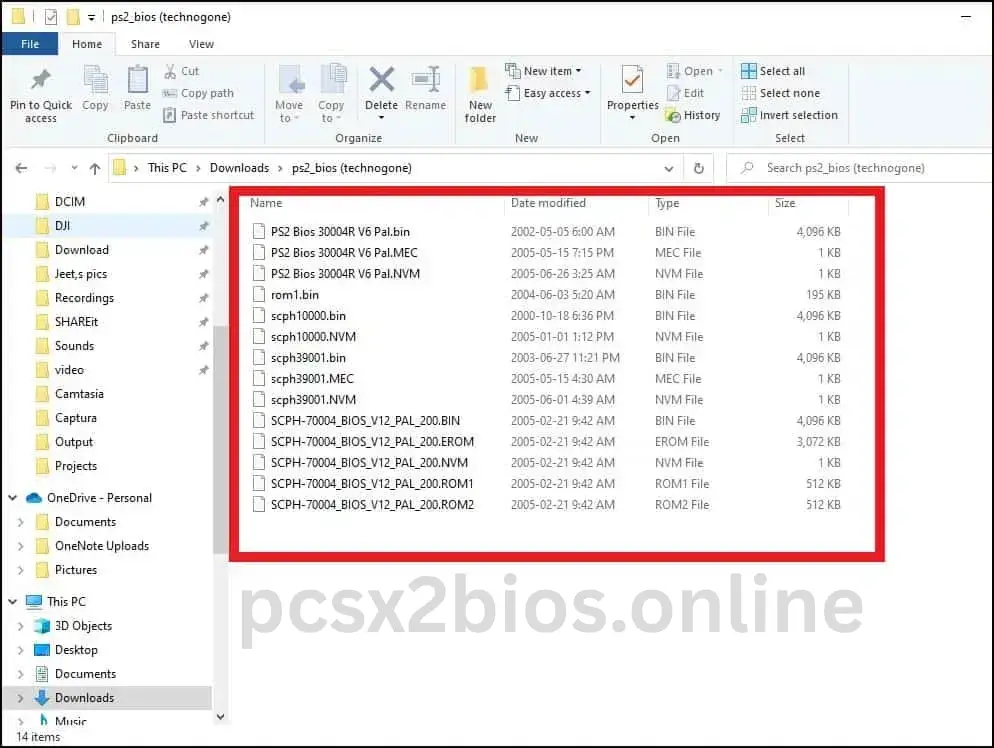
What are SCPH Model Numbers?
SCPH is Sony’s internal model naming system for the PlayStation 2. Each number points to a specific hardware revision.
SCPH-30000
This is one of the earliest Japanese “Fat” PS2 models. It uses an older BIOS revision. It runs a BIOS version from the early days of the console, which means it has limited compatibility with later game titles.
SCPH-39001
SCPH-39001 is a mid-generation model released in North America. This version hits a solid middle ground – stable, well-tested, and compatible with a wide range of games and strong game compatibility in PCSX2.
SCPH-70012
SCPH-70012 comes from the Slim PS2 line. Sony redesigned the hardware for this version, making it smaller and cheaper to produce. The BIOS on Slim models runs slightly differently from the original Fat PS2 hardware.
Slim vs Fat
Slim vs Fat matters more than people expect. Fat PS2 models (SCPH-30000 through SCPH-50000 range) use an older BIOS architecture. Slim models (SCPH-70000 and above) use a revised version. For most emulation purposes, both work – but some games behave differently depending on which BIOS version is loaded.
Region-Based BIOS Versions
Sony region-locked the PS2 at the BIOS level, which means the BIOS file you use determines which region’s games will run without issues.
For best results, the BIOS region should match the game ISO region. Mixing regions can cause boot issues or display problems.
Which PS2 BIOS File Should You Use?
For PCSX2 on PC, the SCPH-70012 or SCPH-39001 USA BIOS files are the most reliable. For AetherSX2 on Android, the same USA BIOS files work well – SCPH-77001 is also popular for lower-powered devices. Always use a clean, verified BIOS file and match BIOS region with game region.
Why USA BIOS Is Most Recommended (Compatibility & Stability)
The USA NTSC-U BIOS, especially SCPH-39001 and SCPH-70012, is widely recommended because most emulator testing and community support focus on this region. Many compatibility reports and configuration guides are based on NTSC-U systems.
It runs at 60Hz, which aligns well with most modern displays. It also supports a large portion of the PS2 game library without region-related issues.
For general use, NTSC-U BIOS offers stable performance and fewer setup complications in PCSX2 and AetherSX2.
How to Extract BIOS from a PS2 Console (Recommended Method)
The safest way to get a PS2 BIOS is to extract it from your own PlayStation 2 console. This method keeps you within legal limits and ensures the file is clean and authentic. It may sound technical at first, but if you follow the steps carefully, it is manageable even for beginners.
You will use a small homebrew tool to copy the BIOS from your console onto a USB drive. After that, you can transfer it to your PC and use it in PCSX2 or move it to your Android device for AetherSX2.
Tools Required
Before starting, gather the following items:
Make sure the USB drive is empty before starting to avoid confusion.
Step-by-Step Extraction
Complete all the following steps for successful BIOS extraction.
Step 1 – Insert FreeMCBoot Memory Card
Place the FreeMCBoot memory card into Slot 1 of your PS2. Turn on the console. Instead of the normal PS2 browser screen, you will see the FreeMCBoot menu. This confirms the memory card is working correctly.
Step 2 – Connect the USB Drive
Insert your FAT32 formatted USB drive into the PS2 USB port. If the drive is not formatted correctly, the console may not detect it.
Step 3 – Open uLaunchELF
From the FreeMCBoot menu, select uLaunchELF. This is a file manager that allows you to run applications stored on your memory card or USB drive.
Step 4 – Launch the BIOS Dumper Tool
Navigate to the location where the BIOS Dumper is saved. Select it and run the program. The tool will begin reading system firmware directly from your PS2 motherboard.
Step 5 – Wait for the Dumping Process to Finish
The screen will show progress while files are being copied to the USB drive. This may take a few minutes. Do not power off the console during this time. Interrupting the process can corrupt the files.
Step 6 – Verify File Creation
After completion, the tool will display a success message. Turn off the console and remove the USB drive. Plug it into your computer and confirm that multiple BIOS files are present, not just a single file.
Step 7 – Store the BIOS Files Safely
Create a new folder on your computer and copy all BIOS related files into it. Do not rename or delete any files. Emulators require the complete set to function correctly.
Once copied, you can place these files inside the BIOS folder for PCSX2 or import them into AetherSX2 on Android.
If the emulator fails to detect the BIOS, check three things:
- All files were copied
- Files are inside the correct BIOS directory
- The files are not renamed
This method ensures you are using a legally obtained and clean BIOS file directly from your own hardware. It also reduces the risk of corrupted downloads or malware.
Where to Get PS2 BIOS Files Safely
The safest way to get a PS2 BIOS is to extract it from your own PlayStation 2 console. This ensures the file is original, complete, and legally obtained.
Platforms like pcsx2bios.online are trusted source to download pcsx2 bios and designed to provide clear setup guides, version explanations, and compatibility information so users understand which BIOS type they need and how to configure it correctly. When using any BIOS file, make sure it is authentic and legally obtained.
How to Verify BIOS Integrity (CRC Check)
A CRC or MD5 check confirms that your PS2 BIOS file is complete and unmodified. Think of it like a digital fingerprint. Every clean BIOS file has a unique hash value. If even one small byte changes, the hash changes too.
Verifying the hash helps prevent crashes, red screen errors, or hidden malware issues in PCSX2 or AetherSX2.
On Windows
- Place your BIOS file somewhere easy to access, such as the Desktop.
- Open PowerShell.
- Type:
Get-FileHash "C:\path\to\biosfile.bin" -Algorithm MD5
- Press Enter.
PowerShell will generate a long string of letters and numbers. This is the hash value. Compare it with a known verified MD5 or CRC value from trusted emulator documentation. If both values match exactly, your BIOS file is clean.
On macOS
- Open Terminal.
- Type:
md5 /path/to/biosfile.bin
- Press Enter.
The system will display an MD5 value. Compare it with a verified reference value. A perfect match confirms file integrity.
On Android
- Install a checksum app such as Hash Droid from the Play Store.
- Open the app and select your BIOS file.
- Run an MD5 check.
Compare the result with a verified hash value.
If the hash does not match, delete the BIOS file immediately. A mismatch means the file is corrupted or modified.
Best PS2 Emulators That Support BIOS Files
If you want to run PS2 games properly, you need an emulator that supports loading a real PS2 BIOS file. Not all emulators handle BIOS the same way. Some require manual setup, while others try to simplify the process.
Below are the most reliable options based on stability, compatibility, and active development.
PCSX2
Windows, macOS, Linux
PCSX2 is the most stable and widely used PlayStation 2 emulator for desktop systems. It requires a valid PS2 BIOS file during first-time setup and supports ISO files, graphics adjustments, and memory card management.
System Requirements
Minimum
- 64-bit Windows 10 / macOS 11
- Intel Core i5 / AMD Ryzen 3
- 8 GB RAM
- DX12 or Vulkan GPU
Recommended
- Intel Core i7 / AMD Ryzen 5+
- 16 GB RAM
- NVIDIA GTX 1650 or better
BIOS Setup
Place BIOS files in Documents → PCSX2 → bios. On first launch, select your BIOS version in the setup wizard. Verify detection under Settings → BIOS.

AetherSX2
ARM-based mobile devices
AetherSX2 is the most reliable PS2 emulator for Android. It requires a valid PS2 BIOS file before running games and supports controller input, resolution scaling, and memory card management.
Device Requirements
Minimum
- Snapdragon 845 or newer
- At least 6 GB RAM
- Android 8.0 or higher
BIOS Import
Copy BIOS files to your phone storage. On first launch tap “Import BIOS”, browse to your files, and select the correct BIOS. Set renderer to Vulkan or OpenGL, keep resolution at 1x for stability.
DamonPS2
DamonPS2 is another Android based PS2 emulator. It supports BIOS files and can run many games. However, it has faced criticism related to licensing and performance consistency. Users should review current development status before installing.


Play! Emulator
Play! is an experimental PS2 emulator available on multiple platforms. It does not always require a traditional BIOS file because it uses its own high level system implementation.
Compatibility is still limited compared to PCSX2. It may run simpler titles but struggles with many popular games. It is more suitable for testing than full gameplay.
For desktop systems, PCSX2 remains the most stable choice. For Android, AetherSX2 provides the best balance of performance and compatibility.
PCSX2
PCSX2 is an open source PlayStation 2 emulator first released in 2002. It copies PS2 hardware behavior so games can run on modern computers. During first time setup, PCSX2 requires you to select a valid PS2 BIOS file. After that, you can load ISO files directly from your storage. The emulator supports save states, internal resolution scaling, widescreen patches, and controller support.
PCSX2 performance depends heavily on CPU strength. A stronger processor reduces lag and improves game stability. If your system is older, lowering resolution scaling inside the emulator can improve performance.
How to Install PCSX2 on pc and Mac
Installing PCSX2 on your computer takes only a few minutes. Once installed, you can add your PS2 BIOS file and begin setting up your games.
To install the emulator, download the latest PCSX2 build from a trusted source. Platforms like pcsx2bios.online provide setup guidance, version details, and direct links to official builds so users can install the correct version safely.
When downloading:
- Choose the correct version for your system: Windows or macOS
- Avoid modified or repacked installers
- Make sure the file comes from the official PCSX2 release source
Using the latest stable build improves compatibility and reduces setup errors.
Follow these steps to install PCSX2 correctly.
Step 1 – Run the Installer
After downloading, double click the installer file. On Windows, it will be an .exe file. On macOS, it may come as a .dmg package.

Step 2 – Follow Setup Instructions
The setup wizard will guide you through installation. Choose the default options unless you need a custom installation path.
Step 3 – Launch PCSX2
Once installed, open the emulator. During first launch, it will ask you to configure plugins and select your PS2 BIOS file.
Step 4 – Complete First Time Configuration
Select your BIOS file from the BIOS folder. After that, the emulator setup will complete, and you will reach the main dashboard.
If PCSX2 does not open or shows missing files, reinstall using the latest version. Most setup problems occur when users download outdated builds or incomplete installers.
After installation, you are ready to configure graphics settings and load your PS2 game ISO files.
On Mac:
Step 1 – Open the downloaded DMG file. Drag the PCSX2 app into your Applications folder.
Step 2 – The first time you open it, macOS will block it with a security warning because it’s not from the App Store. Go to System Settings, then Privacy & Security, scroll down and click “Open Anyway” next to the PCSX2 entry.
Step 3 – PCSX2 will open and launch the setup wizard, same as Windows. Point it to your BIOS file when prompted.
Step 4 – Once the BIOS is detected, the wizard completes and you’re ready to load a game.
One thing worth doing on both platforms right after setup: go to Settings, then BIOS, and confirm the correct region BIOS is showing as active. It should display the SCPH model number and region. If it’s blank or showing an error, the file isn’t in the right folder or the file itself has a problem.
How to Set Up PS2 BIOS on PCSX2 (Step by Step)
Setting up a PS2 BIOS in PCSX2 is simple once you know where to place the files. The emulator cannot run games until it detects a valid BIOS. Follow these steps carefully and you will complete the setup in a few minutes.
Where to Place the BIOS File
After extracting your BIOS from your PS2 console, copy all BIOS related files into the correct folder on your computer.
On Windows, the default BIOS folder is usually inside the PCSX2 documents directory.
Example path:
Documents → PCSX2 → bios
On macOS, the BIOS folder is created inside the PCSX2 configuration directory after installation.
Important tips:
- Do not rename BIOS files
- Keep all dumped files together
- Do not place the file inside random folders
PCSX2 scans only the assigned BIOS directory. If the file is placed elsewhere, it will not appear during setup.
Configuring BIOS in First Time Setup Wizard
When you launch PCSX2 for the first time, a setup wizard opens automatically.
Step 1 – Select your language and continue.
Step 2 – When prompted, click “Browse” to open the BIOS selection screen.
Step 3 – PCSX2 will scan the BIOS folder automatically.
If your BIOS files are placed correctly, you will see the version number and region listed. Select your preferred BIOS version, then click Finish.
The emulator is now configured to use that BIOS for all games.
Verifying BIOS Detection
After setup, confirm that PCSX2 detects your BIOS correctly.
Open PCSX2 and go to the BIOS selector menu. You should see:
- BIOS version number
- Region type such as NTSC U, PAL, or NTSC J
- Console model number like SCPH 39001
If no BIOS appears, check these common issues:
- Files are not inside the correct BIOS folder
- Files were renamed
- The dump process was incomplete
Once the BIOS is detected properly, you can load your PS2 ISO file and start playing.
How to Install and Use PCSX2 on Android
PCSX2 is available on Android in a beta stage via the Google Play Store and GitHub.
Requirements:
- Android 8.0 or higher
- ARM64-based device
- At least 4 GB RAM
- Vulkan/OpenGL ES 3.2 support
Installation Steps
- Download PCSX2 for Android
- Option 1: PCSX2 on Google Play Store (Beta)
- Option 2: GitHub Nightly Builds
- Install BIOS
- Transfer your legally obtained PS2 BIOS to your Android device.
- Open PCSX2 and navigate to the BIOS folder to select it.
- Add PS2 Games
- Place PS2 ISO files on your device storage (e.g.,
Download/PCSX2/Games). - Tap on “+” inside the app to add your games directory.
- Place PS2 ISO files on your device storage (e.g.,
- Configure Controls
- On first launch, you can use on-screen controls or connect a Bluetooth controller.
- Customize layout and sensitivity from the settings.
- Run the Game
- Select a game from the main menu and tap to launch.
Tips for Best Performance
- Use Vulkan renderer for better performance on most devices.
- Enable fast boot and disable unnecessary enhancements if your device is low-end.
- Ensure that your BIOS file matches the region of the game for better compatibility.
- Use save states carefully, as they can sometimes cause crashes if misused.
PCSX2 is a reliable option for those who want to relive PS2 classics with better visuals and performance on modern hardware. With its recent expansion to Android, it opens the door for mobile gaming enthusiasts as well.
PS2 Emulation on Android – Best Available Options
If you want to play PS2 games on your phone, you need an emulator built specifically for Android. Desktop emulators are not designed to run directly on mobile devices. Performance also depends heavily on your phone’s processor and available RAM.
Here are the realistic options for Android users.
Is PCSX2 Available on Android?
No, PCSX2 is not officially available for Android. It is designed for Windows, macOS, and Linux computers.
AetherSX2 Is Recommended
AetherSX2 is the most stable PS2 emulator built for Android devices. It is designed for ARM processors used in modern smartphones.
Like desktop emulators, AetherSX2 requires a valid PS2 BIOS file before running games. After importing the BIOS, you can load ISO files stored on your device. The emulator supports controller input, memory cards, and resolution adjustments.
For best performance, your phone should have:
- A Snapdragon 845 processor or newer
- At least 6 GB of RAM
- Android 8.0 or higher
Lower end devices may struggle with demanding games. Reducing internal resolution inside the emulator can improve stability.
How to Set Up PS2 BIOS on AetherSX2 (Android)

To run PS2 games on your phone, you must first add a valid PS2 BIOS inside AetherSX2. The emulator will not start any game until the BIOS is imported correctly.
The steps below give you a clear overview. If you want a detailed walkthrough with screenshots and advanced settings, read our complete guide on How to Set Up PS2 BIOS on AetherSX2.
Performance and BIOS Configuration Tips
Once your PS2 BIOS is working correctly, small configuration changes can improve speed and stability. Most performance issues are not caused by the BIOS itself, but by emulator settings. Adjusting the right options in PCSX2 can reduce lag, fix glitches, and improve gameplay.
Start with default settings first. If a game runs slowly or shows graphical problems, adjust one setting at a time so you know what caused the change.
Speedhacks Settings
Speedhacks are built in performance tweaks inside PCSX2. They reduce CPU load by adjusting internal timing. When enabled carefully, they improve frame rate without breaking the game.
Best practice:
- Keep default speedhack settings for most games
- Increase EE Cycle Rate slightly if the game runs slow
- Avoid pushing sliders to maximum, as this may cause crashes
If a game starts freezing after enabling speedhacks, reset them to default.
Renderer Configuration
The renderer controls how graphics are processed. PCSX2 usually offers:
- Vulkan
- Direct3D 11 or 12
- OpenGL
Vulkan or Direct3D 12 often provide better performance on modern GPUs. If you notice graphical glitches, switching the renderer can solve the issue quickly.
Use hardware rendering for better visuals. Switch to software rendering only if a game has visual bugs that cannot be fixed.
Resolution Scaling
Resolution scaling increases internal game resolution beyond the original PS2 output. At 1x resolution, the game runs at native PS2 quality. Increasing to 2x or 3x improves sharpness but uses more CPU and GPU power.
If your game feels slow:
- Lower internal resolution to 1x
- Disable extra visual enhancements
Higher resolution looks better, but performance always comes first.
Game Specific Fixes
Some PS2 games require small adjustments to run correctly. PCSX2 includes per game settings that allow you to:
- Enable automatic fixes
- Apply patches
- Adjust specific timing options
Check the PCSX2 compatibility list for recommended settings for your game. Avoid changing multiple fixes at once. Test one adjustment, then check results.
Compatibility Mode Adjustments
If a game crashes or fails to boot even with a correct BIOS, try compatibility settings.
You can:
- Switch renderer type
- Disable aggressive speedhacks
- Reset emulator settings to default
Compatibility mode is useful for older or complex titles. In many cases, reverting to default settings solves unexpected errors.
Best PS2 Games to Test BIOS Compatibility
To confirm your PS2 BIOS is working correctly, test it with well known and stable PlayStation 2 titles. These games are widely used in compatibility testing for PCSX2 and AetherSX2 because they boot reliably and expose common setup issues.
Here are a few good test titles:
- God of War II
This game loads a heavy intro sequence and in game cutscenes. If it boots without freezing, your BIOS and graphics setup are likely correct. - Gran Turismo 4
Useful for checking memory card detection and stable gameplay performance. - Shadow of the Colossus
Demanding title that helps test rendering and compatibility stability. - Tekken 5
Fast to load and good for confirming basic boot and controller input.
If these games boot properly without red screen errors, black screens, or crashes, your BIOS setup is likely correct. If problems appear immediately, recheck BIOS placement, region matching, and file integrity before adjusting performance settings.
Conclusion
Getting your PS2 BIOS set up is the one step that makes everything else work. Pick the right version for your region, load it into PCSX2 or AetherSX2, and your entire PS2 library opens up.
If you’re on PC, the SCPH-39001 or SCPH-70012 USA BIOS files are your safest bet. On Android, the same files work just as well inside AetherSX2.
Every BIOS file on pcsx2bios.online is CRC-checked and verified before it goes up. Download your file, follow the setup steps in this guide, and you’ll be running your first game in under 10 minutes.
Still stuck? The troubleshooting section above covers every common error with a fix. Chances are your answer is already there.
Frequently Asked Questions
Is BIOS Required for PCSX2?
Yes, a PS2 BIOS is required for PCSX2. The emulator does not include Sony’s system firmware. Without a valid BIOS file, PCSX2 will not boot games and will show a “BIOS not found” error during setup. The BIOS creates the PlayStation 2 system environment that allows ISO files to run properly.
Which PS2 BIOS Version Is Best?
For most users, NTSC U versions like SCPH 39001 or SCPH 70012 are commonly used because they offer strong compatibility across many titles. Newer revisions generally perform better with updated emulator builds. The best choice also depends on your game region. Matching BIOS region with your ISO region reduces boot errors.
Can I Use the Same BIOS on PC and Android?
Yes, you can use the same valid BIOS file on both PC and Android. Once extracted from your console, the BIOS works in both PCSX2 and AetherSX2. Just copy the same BIOS files to each device and import them inside the emulator settings.
What Is SCPH 70012 BIOS?
SCPH 70012 is a North American Slim PlayStation 2 model. Its BIOS version is widely used in emulation because it belongs to a later hardware revision. It offers good compatibility with modern PCSX2 builds and Android emulators.
Why Is My BIOS Not Showing in PCSX2?
If your BIOS does not appear in the selection menu, check the following:
Files are not placed inside the correct BIOS folder
Files were renamed
The dump process was incomplete
The BIOS file is corrupted
Restart PCSX2 after placing the files correctly. The emulator will rescan the folder and list valid BIOS versions automatically.